After reading Scott’s post on creating an oData API for StackOverflow, I got inspired and was planning to book a long flight ticket to do some work with oData. Finally, over the weekend, I’ve decided to stay at home and create a quick browser in Silverlight for Nerd Dinner ;).
- Final app - http://amazedsaint.net/nerddinner
- Source Code - http://amazedsaint.net/nerddinner/silverlightnerddinner.zip
What we’ll be doing?
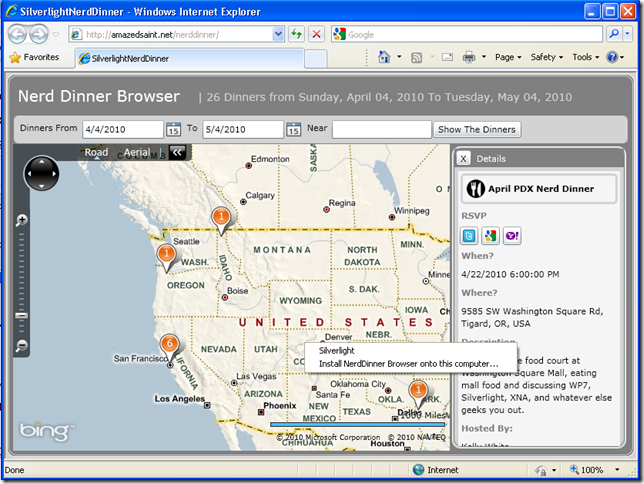
The Silverlight read only client can pull Dinners and RSVPs from Nerd Dinner website over the oData endpoint, and show them via the Bing maps control for Silverlight. I ended up putting the whole pieces together in less than two hours. You may also click a pushpin to view the dinner details. Wow, that was super easy. Have a look at the final app before we start, or see this video.
Now, let us have a look at how to build the above app. Download the source and keep it handy. Of course,you may do a lot of other exciting things as well – Creating a Windows Phone 7 client version of this, or creating a NetFlix oData client in Silverlight.
Let us get back. In summary, this is what we’ll be doing now.
- Creating a Silverlight project
- See how to consume oData in Silverlight
- Use NerdDinner oData endpoint to pull Dinners and RSVPs from our Silverlight client
- Show them in a Bing map using Bing’s Silverlight Map SDK by geo-coding the addresses
- Enable our Silverlight application to run Out of Browser
We’ll be using the following technology stack. All these downloads are free for you.
- Visual Studio 2010 RC
- Silverlight 4 Tools for Visual Studio 2010.
- Silverlight Toolkit March 2010 Release (coming soon)
- Bing Maps Silverlight Control SDK
- oData end point (http://nerddinner.com/Services/OData.svc/) from Scott’s Nerd Dinner website
- You should get a Bing Map API Key to use in your application from Bing Map account center
Once you’ve the above pieces installed, you are good to explore the source code of Silverlight Nerd Dinner,or to roll out your own. So, here we go.
1- Creating a Silverlight Project
Create a new Visual C#->Silverlight Application Project in Visual Studio, and add the following references from the Add Reference dialog.
Note: You can add references to Bing maps control related libraries (Microsoft.Map.*) from C:\Program Files\Bing Maps Silverlight Control\V1\Libraries, if it is not available in the Add References dialog box
2 – Consuming oData in Silverlight
If you are still wondering what is oData, you’ve definitely missed the Mix10K talks.
The Open Data Protocol (OData) is an open protocol for sharing data. It provides a way to break down data silos and increase the shared value of data by creating an ecosystem in which data consumers can interoperate with data producers in a way that is far more powerful than currently possible, enabling more applications to make sense of a broader set of data. Every producer and consumer of data that participates in this ecosystem increases its overall value.
Checkout the oData.org and oData FAQ if you want to learn more. Also, in this Mix 10 talks, Scott Hanselman explains how he and Jon Galloway created an oData end point to Nerddinner.com.
Consuming oData services in Silverlight is super easy. First of all, you need to add a service reference, pointing to your oData service. Right click on your Silverlight project in Project Explorer, and click Service Reference. Add a service reference to Nerd Dinner’s oData endpoint.
3 – Pulling Dinners and RSVPs
Once you have the service proxy created, the next step is pulling the Dinners and RSVPs. Most of this work is done in the NerdDinnerService.cs class. Here is an outline of our NerdDinnerServices class. Inside the QueryDinners method, we’ll query the service to pull the dinners in a specific date range.
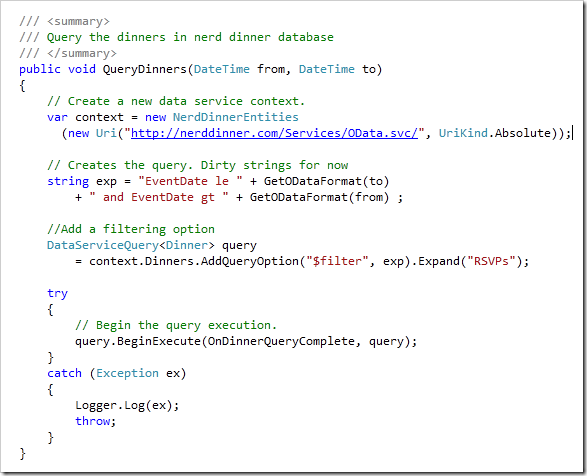
Let us explore the QueryDinners method a bit further (image below). We are creating a new service context, and add a filter there to query the dinners between two given dates. oData supports various URI conventions and query options. For example, a $top query like http://nerddinner.com/Services/OData.svc/Dinners?$top=5 will return the top 5 dinners. If you want to order by a specific field (like EventDate), you can use the $orderby query, like http://nerddinner.com/Services/OData.svc/Dinners?$top=5&$orderby=EventDate
oData URI conventions are pretty simple. You can find a good reference here. In our case, we want to filter the dinners between a date range, so our query will look like ?$filter=EventDate le datetime'2010-05-04T09:23:29' and EventDate gt datetime'2010-04-03T09:23:29'. In an oData query, a date time should be of the format datetime’yyyy-MM-ddThh:mm:ss’. GetODataFormat method will take a date to get us the correct format to create a filter.
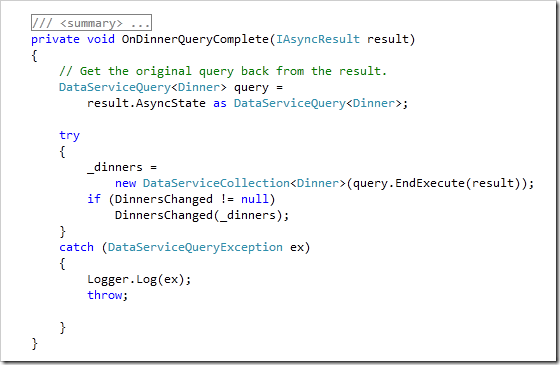
And if you are wondering what that Expand(“RSVPs”) is for, that’ll greedy load all the RSVPs associated with a given Dinner to that we’ll be having that information as well in our result. When we invoke BeginExecute, we should pass a callback (OnDinnerQueryComplete), so that our callback will be invoked once the query execution is done. And inside our OnDinnerQueryComplete, we call EndExecute to fetch the results as shown. Also, we raise the DinnersChanged event in our NerdDinnerService class, so that our view model can be notified.
Now that was pretty simple, isn’t it?
4 – Showing them in a Bing Map
So now, let us put together our view model and our view - so that we can display the dinners in a Map.
The ViewModel
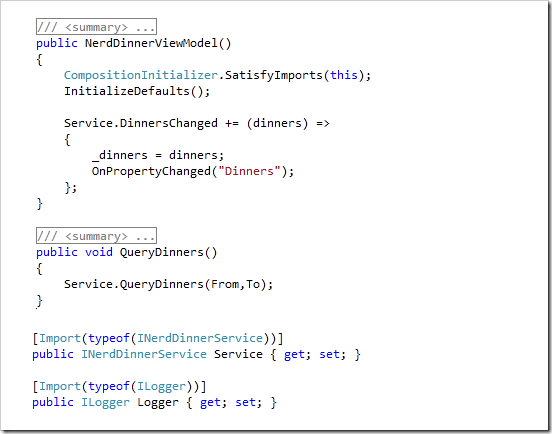
Have a look at the NerdDinnerViewModel.cs, which is pretty minimal. The view model has We’ve a QueryDinners method which simply invokes the QueryDinners method in our data service. Also, you can see that we are using MEF for importing the services to our view model (see those Import(..) attributes). If you want to learn about MEF - you can always read my Introduction to Managed Extensibility Framework – Creating a Zoo and Animals
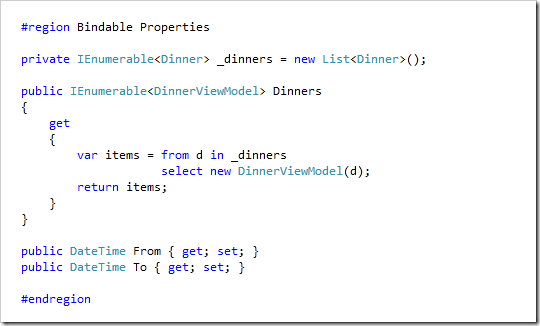
When ever the DinnersChanged event is fired from the data service, we’ll trigger a property changed event, so that the View will rebind to the ‘Dinners’ property in our view model. The ‘Dinners’ property in our View Model is simple. We create a DinnerViewModel class for each Dinner, and return in. Have a look at DinnerViewModel.cs, it has a has a Location property, projected from the Latitude and Longitude properties of a Dinner, for making our bindings easier. Also, we have the From and To properties in our ViewModel, to which the date pickers in our UI is bound to.
The View
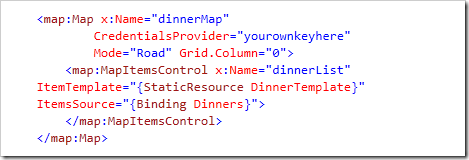
Now comes the most interesting part, the XAML View of our client. Have a look at the MainPage.xaml. The crux of our view a Bing maps control, bound to our Dinners property. Get the Bing Maps key (as described above), and assign your own key to the CredentialsProvider property of the map.
Inside the resources section of the user control, we actually have a DinnerTemplate data template (which is set as the ItemTemplate of our Map control), to display each dinner as a PushPin. The DinnerTemplate decides how each dinner will get rendered in the map. For now, we’ll display the number of attendees as the header of each push pin. We’ll also show a small tooltip when the user hovers his mouse over the push pin. Also, note that we are binding the Pushpin’s Position property to the Location property of our DinnerViewModel.
When the user clicks a Pushpin, we’ll do the following things.
- Show a Details Pane about the selected Dinner (See the DinnerView.xaml control)
- Assign the selected Pushpin’s data context as the data context of the Details Pane
- Zoom to the Address of the clicked Pushpin’s dinner.
Here is the relevant code from the DinnerPushPin_MouseLeftButtonDown handler in MainPage.xaml.cs.
If you are wondering what is searchHelper - The searchHelper is an instance of MapSearchHelper class (See MapSearchHelper.cs). Basically, the ExecuteSearch method will take an address, and find the corresponding lat and long values (address location) using Microsoft' Virtual Earth SearchService – and will zoom the map to the obtained location.
5 – Enabling our Application to Run out of the browser.
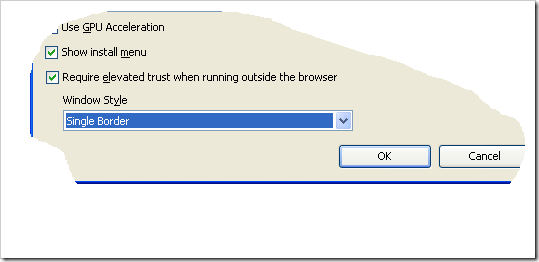
And finally, let us configure our application to run out of browser. To do this, right click your Silverlight project, and goto properties. Check “Enable running application out of browser”, and click “Out Of Browser” button. In the resultant dialog box (shown below), check ‘Require Elevated Trust’, and choose a Window Style you like.
Launch the Silverlight application.
Conclusion
Amazing. Integrating oData with Silverlight, and Bing maps was super easy. Let us launch the application. Right click and select ‘Install NerdDinner browser on this computer’. Search dinners, zoom to places, and click any RSVP button to join (it’ll just redirect to the social services using Scott’s actual NerdDinner site, in a new window).
And now, who want to take this up and build a Windows Mobile Phone 7 client for NerdDinner? It should be easy from here :).
Don’t forget to read my other posts on Silverlight, C# etc. So, have a look at my recent Blog digest for more interesting stuff.


